
Loading...
Loading...
Loading...
Loading...
Loading...
Loading...
Loading...
Loading...
Loading...
Loading...
Loading...
Loading...
Loading...
Loading...
Loading...
Loading...
Loading...
Loading...
Loading...
Loading...
Loading...
Loading...
Loading...
Loading...
Loading...
Loading...
Loading...
Loading...
Loading...
Loading...
Loading...
Loading...
Loading...
Loading...
This document is intended to serve as an integration guide for anyone working with ZAP~POST
List of Integrations available for ZAP~Post:
When Bloomreach profiles are processed through ZAP~POST, they are updated with events to keep you informed of any changes. Below you can see the data contained in each event that ZAP~POST will publish as well as an example event as seen in Bloomreach
Event Name: ZAP~POST Submission Created

ScheduledSendId: The unique identifier for the ZAP~POST Scheduled Send
SubmissionId: The unique identifier given to a batch of records submitted to ZAP~POST
ScheduledSendDateUTC: The date for the scheduled send e.g. 01/01/2025
CampaignName: The name of the campaign that record was submitted against
CampaignId: The unique identifier for the ZAP~POST campaignEvent Name: ZAP~POST Direct Mail Rejected
ScheduledSendId: The unique identifier for the ZAP~POST Scheduled Send
SubmissionId: The unique identifier given to a batch of records submitted to ZAP~POST
ScheduledSendDateUTC: The date for the scheduled send e.g. 01/01/2025
CampaignName: The name of the campaign that record was submitted against
CampaignId: The unique identifier for the ZAP~POST campaign
RejectedDate(UTC): The date the record was rejectedEvent Name: ZAP~POST Direct Mail Sent
ScheduledSendId: The unique identifier for the ZAP~POST Scheduled Send
SubmissionId: The unique identifier given to a batch of records submitted to ZAP~POST
ScheduledSendDateUTC: The date for the scheduled send e.g. 01/01/2025
CampaignName: The name of the campaign that record was submitted against
CampaignId: The unique identifier for the ZAP~POST campaignEvent Name: ZAP~POST QR Code Scan
ScheduledSendId: The unique identifier for the ZAP~POST Scheduled Send
SubmissionId: The unique identifier given to a batch of records submitted to ZAP~POST
ScheduledSendDateUTC: The date for the scheduled send e.g. 01/01/2025
CampaignName: The name of the campaign that record was submitted against
CampaignId: The unique identifier for the ZAP~POST campaign
ScanDate(UTC): The date the QR code was scanned
ScanTime(UTC): The time the QR code was scanned
DestinationURL: The URL the recipient was directed toEvent Name: ZAP~POST Direct Mail Returned
ScheduledSendId: The unique identifier for the ZAP~POST Scheduled Send
SubmissionId: The unique identifier given to a batch of records submitted to ZAP~POST
ScheduledSendDateUTC: The date for the scheduled send e.g. 01/01/2025
CampaignName: The name of the campaign that record was submitted against
CampaignId: The unique identifier for the ZAP~POST campaign
ReturnedDate(UTC): The date the returned Zap was received to sender Events are created automatically and can be viewed on user profiles.

This document is intended to serve as a guide for integrating HubSpot into ZAP~POST.
Summary functionality:
Collect recipient data from HubSpot Lists (Active and Static)
Map to ZAP~POST Campaign
Map any custom fields you have set up in the ZAP~POST Campaign
Events are added to HubSpot profiles.
Integration to HubSpot is directly available from your ZAP~POST account, once signed in.
When a campaign is created, connect Recipient data via “Data Sources” from within the app, you will be directed to HubSpot to authorise the integration.
Set up is self-service whilst ZAP~POST’s “Tech-Sherpas” will assist and manage the set up where required, at no additional cost.
In order to ingest Contacts from your Dotdigital List or Segment, you need to ensure you have a campaign created and a design published, see our for a detailed walk through.
From the Campaign Management screen, click the data upload option and then select New Data Connection
Select the Dotdigital tile as your data connection
Using the table, find the List or Segment you want to use and click the connect icon
Confirm your field mapping, on the left you'll see the ZAP~POST campaign fields, using the drop down you can map them to your Dotdigital Contact fields.
Once confirmed, you'll see a confirmation that the List or Segment has been connected
After ZAP~POST has cleansed your data and posted your Zaps, we'll automatically update your Dotdigital Contacts with an updated address, if you don't want this to happen you can turn it off in Settings.


Bloomreach Engagement can integrate with ZAP~POST. This guide explains how to set up the integration with ZAP~POST and provides two use cases as examples of how to use ZAP~POST with Bloomreach Engagement.
You'll need to create ZAP~POST API credentials. API credentials allow authentication for incoming webhook requests.
To create an API key:
In the ZAP~POST app, click Settings > Api Consumers.
Click Add New Consumer.
Fill in the Consumer Name field with a name you want it to have.
Make sure you Enable the Consumer.
Click Generate New Keys.
Copy the key and password and store them safely for later use.
Finish by clicking Create Consumer.
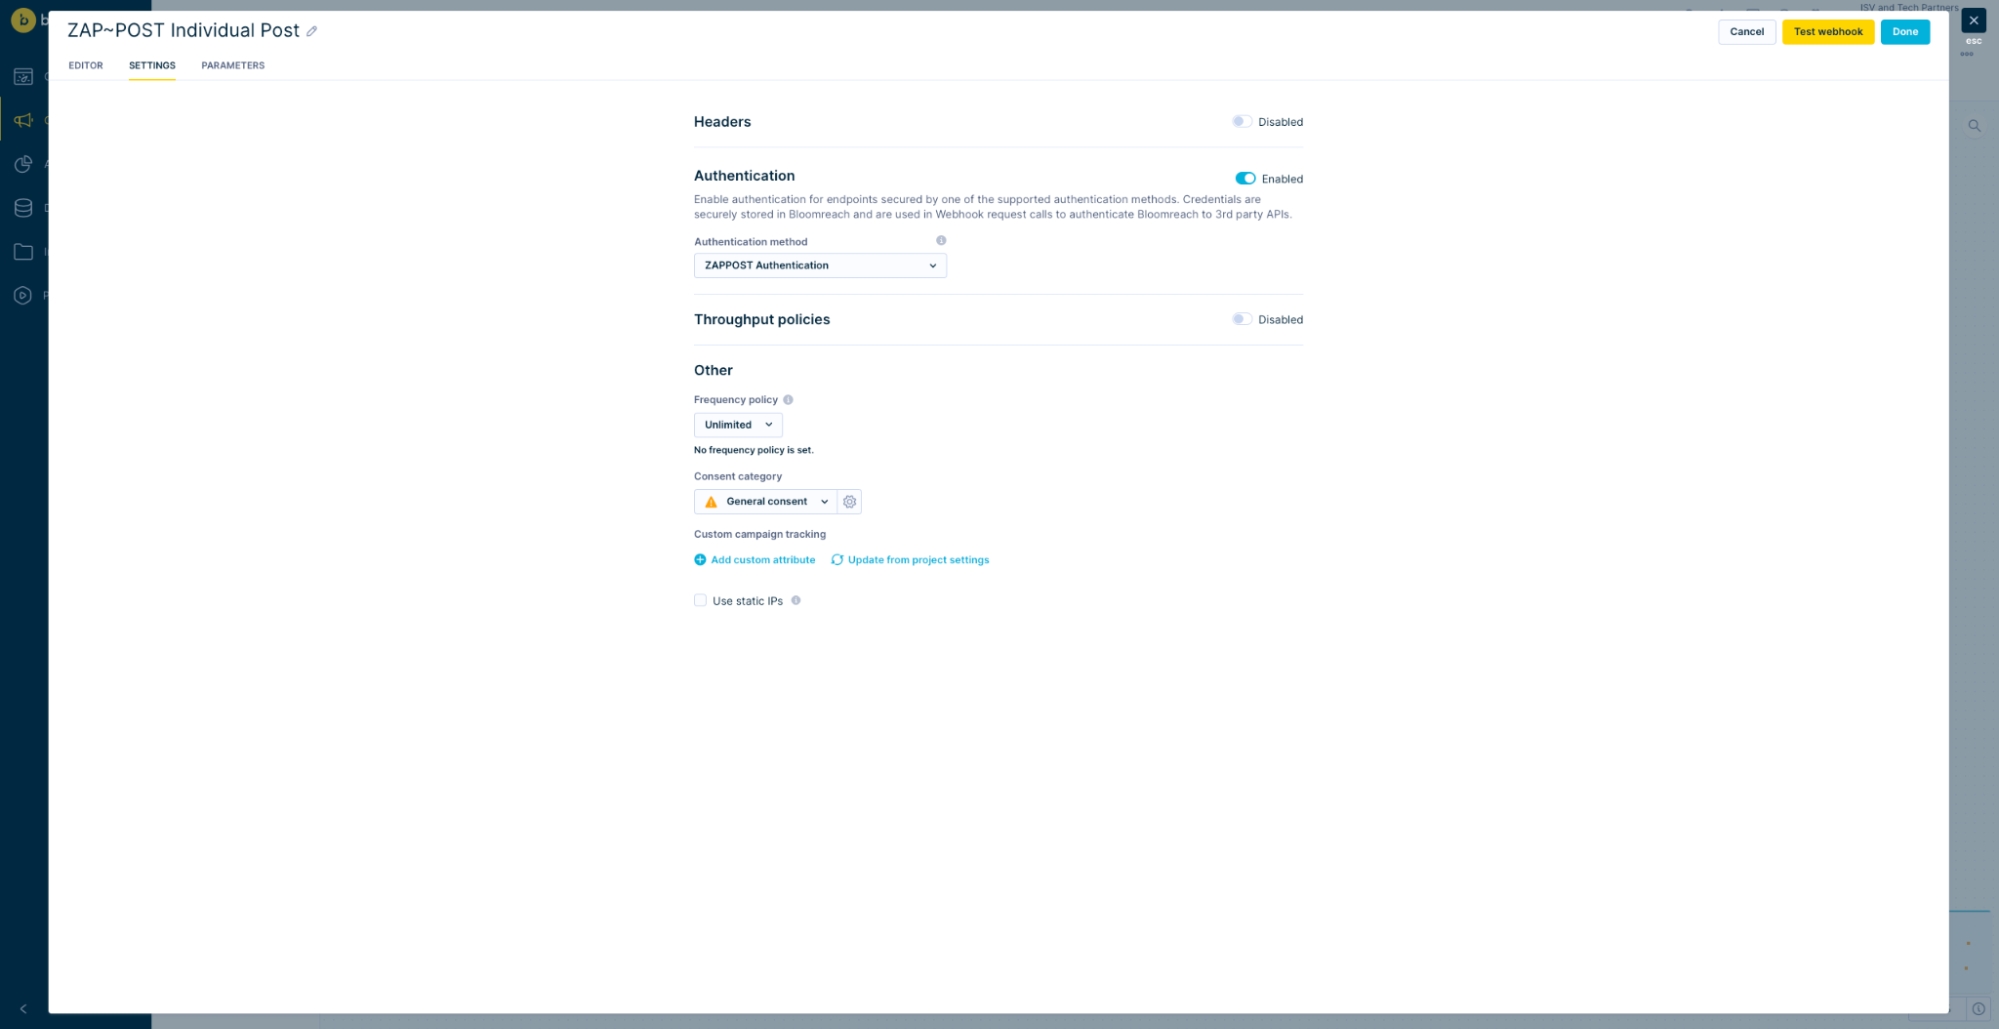
In Bloomreach Engagement, configure the webhook authentication for ZAP~POST so that data can be passed securely in the webhook request. You will use this webhook authentication while creating a scenario in a later step.
To configure webhook authentication:
In Bloomreach Engagement, open Data & Assets > Integrations.
Click Add new integration > HTTP Authentication Schemas > Add integration.
Edit the name of the Integration - so anyone knows it is for your ZAP~POST account.
In Endpoint, enter the ZAP~POST API base URL:
https://api.zappost.com
Make sure you select the Basic Authentication method.
Enter the following:
Username:
The Api Key from ZAP~POST created in the Setup process
Password:
The Api Password from ZAP~POST created in the Setup process.
Test the integration - when it is all setup properly, the authentication will be successful.
Go ahead and click: Save integration.
Use case
In Bloomreach, we provide an Action webhook preset option for working with ZAP~POST. This preset is available for an endpoint: /api/v1/records - ZAP~POST Individual Post preset.
Imagine you're running an online store, and sometimes customers put items in their shopping cart but don't complete their purchase. When this happens, you may want to let ZAP~POST know about these abandoned carts so personalized messages can be mailed to customers. You can use the ZAP~POST Individual Post preset for this.
However, it's important to understand that this is physical mail, ZAP~POST doesn't send each one individually right away. Instead, ZAP~POST waits until the end of the day and then sends them all together as a single batch. This helps keep things organized and makes it easier to keep track of what's going on. So, if you're looking for updates in your ZAP~POST account on these abandoned carts, you'll need to wait until the day after you've reported them when they've been grouped together.
In a nutshell, the ZAP~POST Individual Post preset is for individual pieces of information.
In your scenario, you can use a combination of operators and actions to send zaps using ZAP~POST to relevant users based on custom conditions.
When using the ZAP~POST Individual Post action, you can also catch error responses returned by this Action node and update your account data or notify your team to check the address of customer, or notify the customer via other channels - email & sms - to update their postal address. You should also remove invalid addresses from future submissions - either via consent revocation or adding a flag to the customer record signifying the postal address is not valid until corrected.
Prerequisites
ZAP~POST
You understand the only parameter required by the Submissions API endpoints, which is a valid campaign ID.
Bloomreach Engagement
You know your audience and scenario execution requirements.
You have collected and are storing relevant customer properties, e.g. postal address, in the Data Manager.
Create a scenario
Let's create a scenario to automate the communication with your users based on custom conditions.
Specifically, you will use an action to send a webhook request to ZAP~POST to send a Zap. For that you will use webhook presets that are created specifically the Bloomreach integration with ZAP~POST.
📘
Your scenario path may vary from the following steps depending on the actions you decide to implement and the dynamic data you choose to include in your user communication. See Personalization Using Jinja.
To create a scenario in Bloomreach Engagement:
In Bloomreach Engagement, open Campaigns > Scenarios > Create new.
(Optional) Click the edit symbol in the scenario name to change it.
Create an action with the webhook request to ZAP~POST.
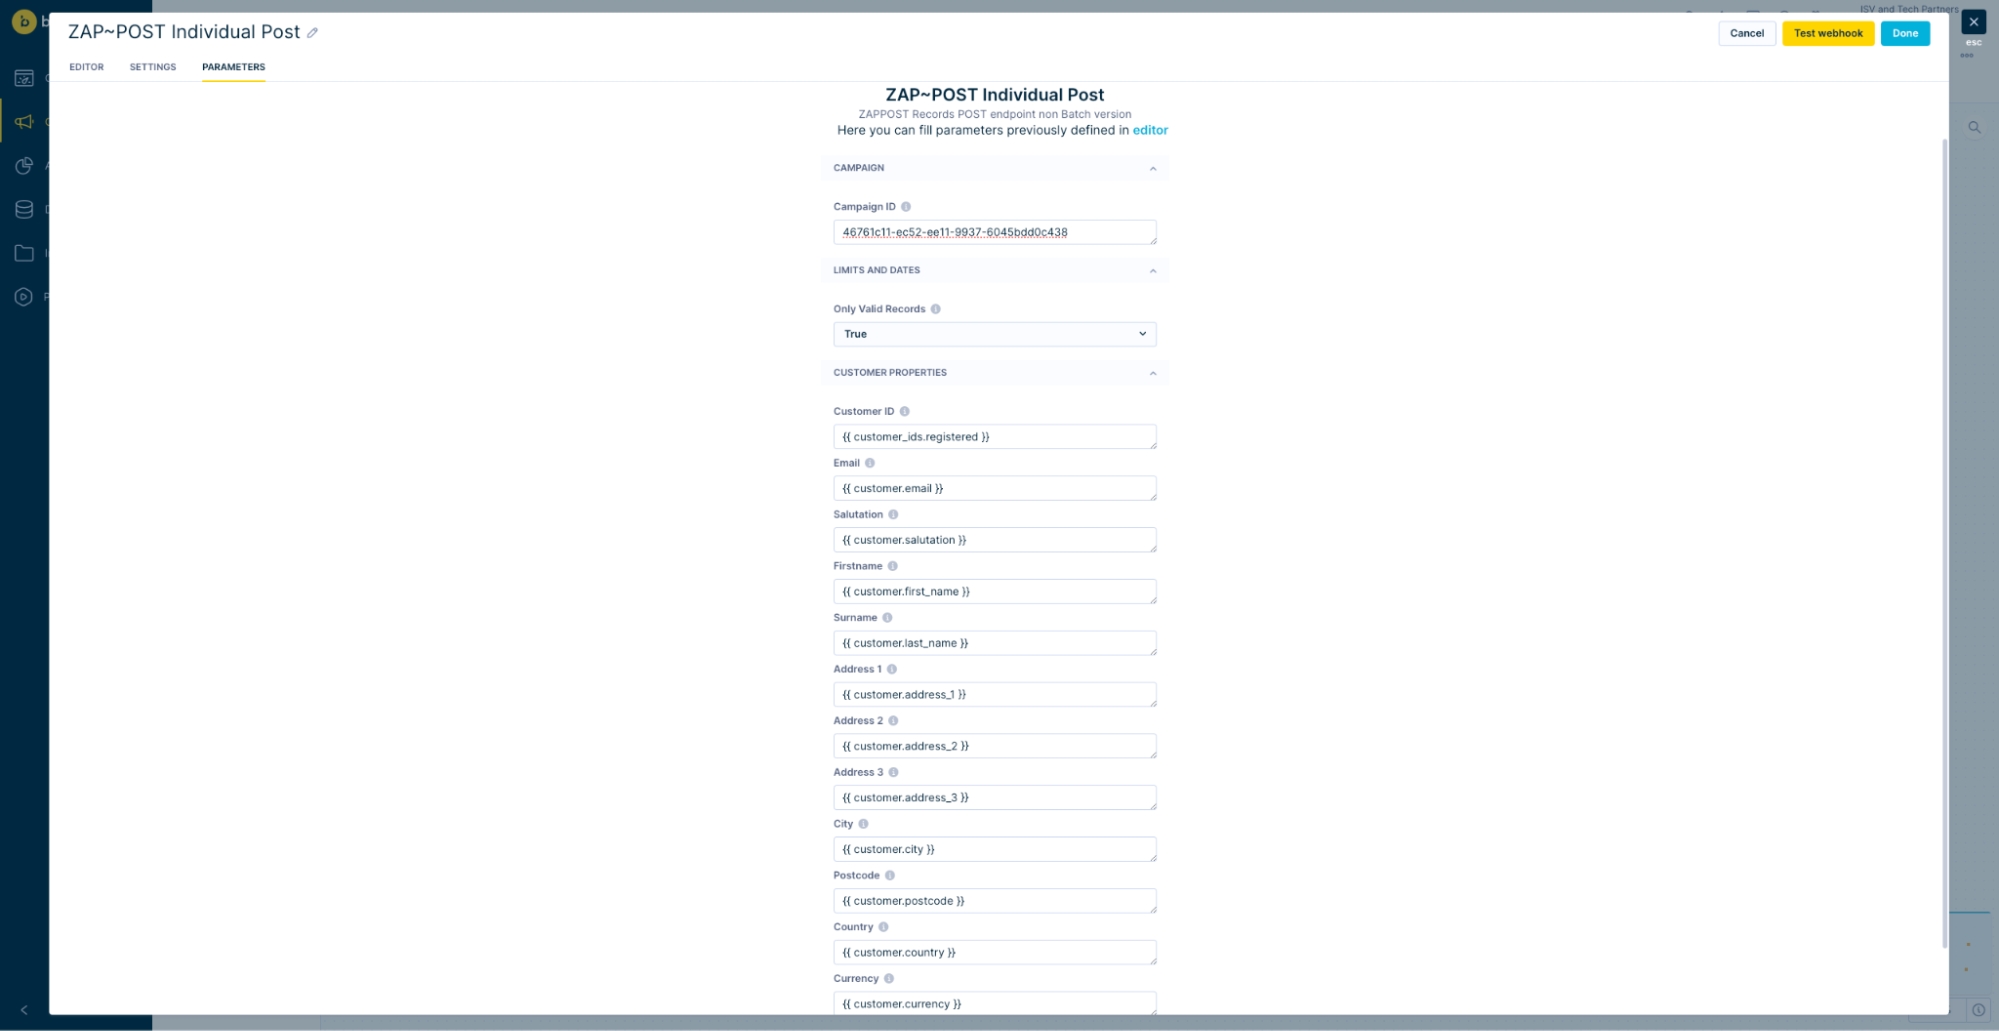
The webhook will be sent even with only Campaign ID and will return code 200, which signals success. However, there will be no information sent to the campaign. You need to customize the customer properties category. There are mandatory properties like, for example, Customer ID and not mandatory, for example, Address 3. Read tooltips by hovering with a cursor over the 'i' and refer to the ZAP~POST documentation.
After an abandoned cart for a day, you can send a zap to all people who didn't complete their purchase in a day. For that, we will use the "ZAP~POST Individual Post" preset.
Make sure you customize customer properties because otherwise, no data will be sent in both examples. You can either modify values in the parameters tab or directly modify JSON. Customer properties that are required:
For more information visit the ZAP POST Documentation.
Click Save.
ZAP~POST also provides an /api/v1/submissions endpoint, which does almost the same thing as the /api/v1/records endpoint.
Suppose you want to send a list of reminders for customers whose subscriptions expire soon or a reactivation campaign for customers who last purchased a while ago. You'd use the /api/v1/submissions endpoint in that case.
In a nutshell, the /api/v1/records endpoint is for individual pieces of information, like abandoned shopping carts, while the /api/v1/submissions endpoint is for sending collections of related information, like lists of reminders or lapsed customers.
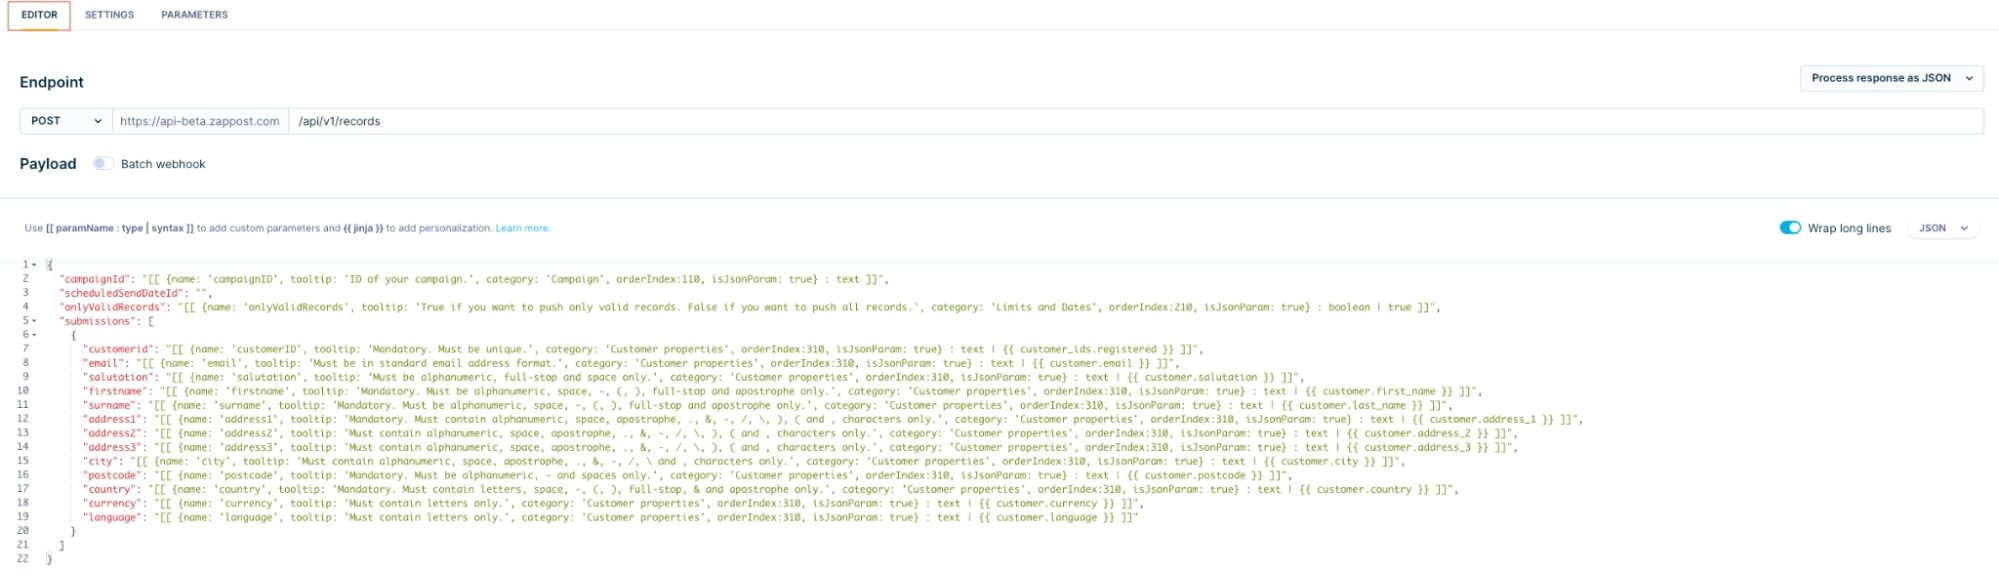
If you want to use the /api/v1/submissions endpoint, use the ZAP~POST Individual Post preset and modify it as shown below.
This is an editor part of the "ZAP~POST Individual Post":
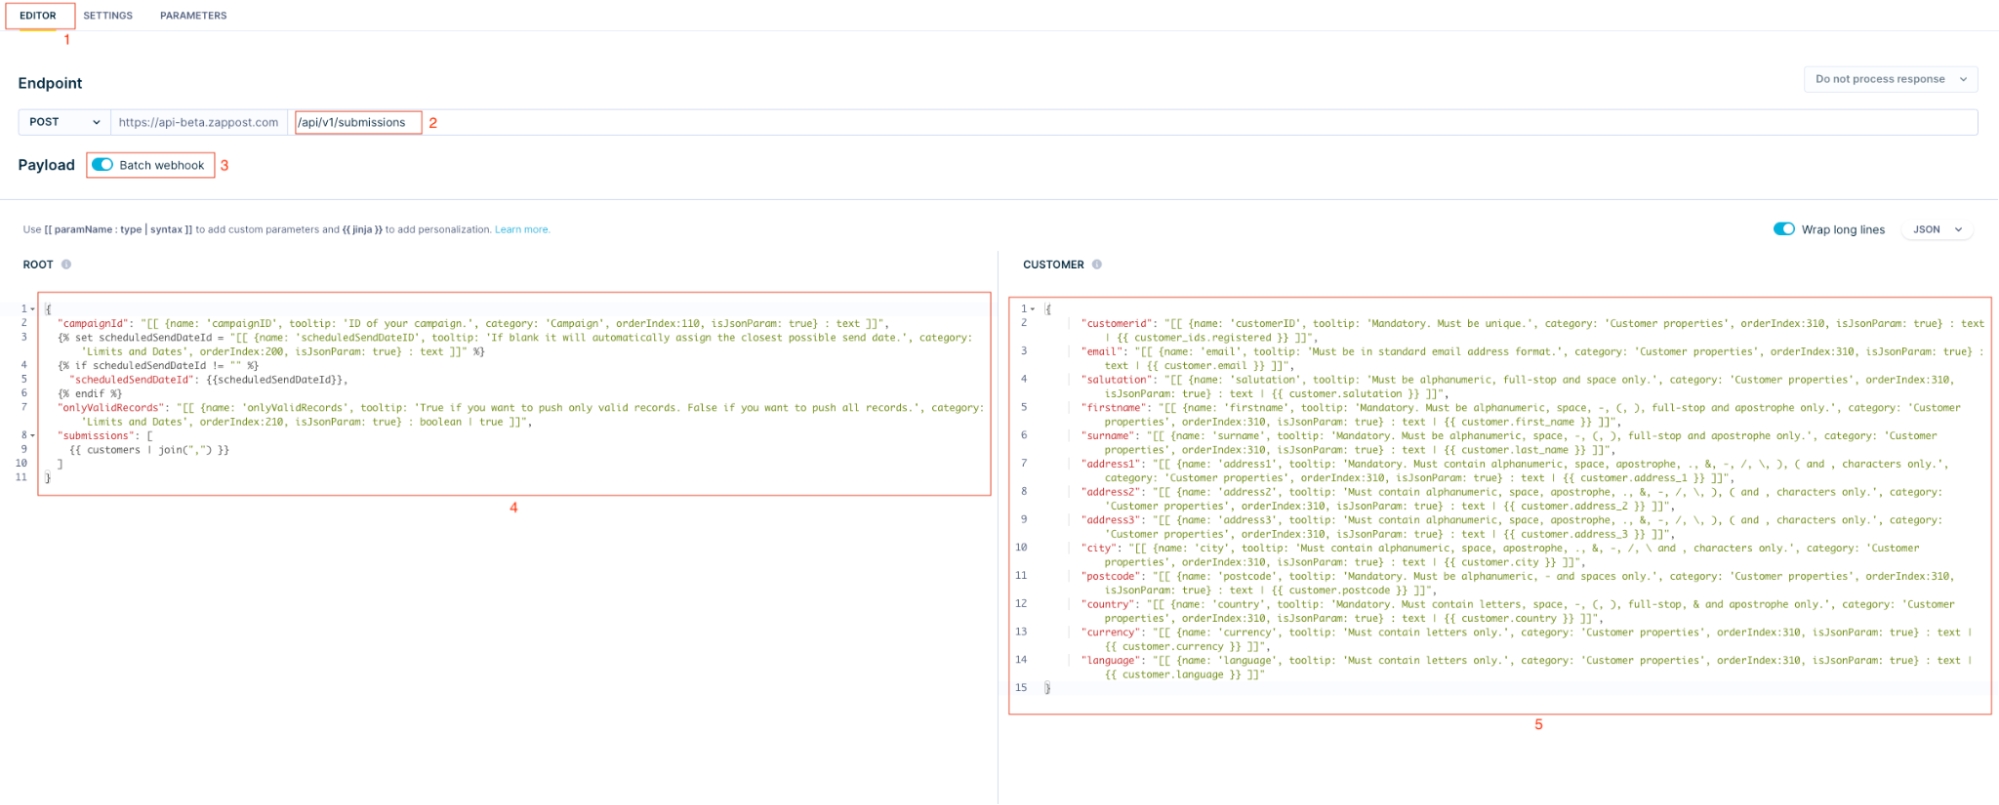
This is how it should be changed:
Click on the Editor tab.
Change Endpoint into /api/v1/submissions.
Click on the Batch webhook button and then on the Turn on and reset template.
Copy and paste everything from the original Payload to the Root part and then change the inside of the "submissions" in the square brackets to:
{{ customers | join(",") }}
Copy and paste the inside of the original "submissions" without the square brackets into the Customer part
Next steps
Before you launch your scenario, you can test and preview the complete workflow in the Test tab. When you click Start, you will see a confirmation window indicating how many customers will be affected by the scenario run.Set the frequency of data collection.
Map to ZAP~POST Campaign.
Map any custom fields you have set up in the ZAP~POST Campaign.
Bloomreach Contacts are updated to record recipients who have/have not received a ZAP.
Any returns (undeliverables) are updated on Bloomreach on a daily basis.
Integration to Bloomreach Engagement can be self-service but if you need any help, ZAP~POST’s “Tech-Sherpas” will assist and manage the setup where required, at no additional cost. Start a web chat from within the app, or send an email to [email protected]
Log into the app at zappost.com
From the Dashboard click on the Integrations tile
Here you will see a tile to add HubSpot
Click Connect. This will direct you to HubSpot's permissions page, click Connect app to give ZAP~POST access to the necessary information to integrate with HubSpot.
You will be redirected back to ZAP~POST, and you will see your HubSpot AppID with a status of Connected
You are all set, your HubSpot account is integrated with ZAP~POST. In order to ingest list data see our Use case how-to guide
This document is intended to serve as a guide for integrating Force24 into ZAP~POST
Summary functionality:
Collect recipient data from Force24.
Map to ZAP~POST Campaign.
Map any custom fields you have set up in the ZAP~POST Campaign.
An Integration to Force24 is available directly from the Force24 Marketplace, once signed in.
When a ZAP~POST campaign is created, connect your Force24 account to submit customer data.
Set up is self-service whilst ZAP~POST’s “Tech-Sherpas” will assist and manage the set up where required, at no additional cost.
This document is intended to serve as a guide for integrating Patchworks into ZAP~POST
Summary functionality:
Collect recipient data from Patchworks
Map to ZAP~POST Campaigns
Include any custom fields created in Patchwork or other integrations
Ingest rejected and returned Zap records into Patchworks
An Integration to Patchworks is available directly from the Patchworks Public Marketplace, once signed in.
When a ZAP~POST campaign is created, connect a Patchworks Process Flow to submit customer data.
Set up is self-service whilst ZAP~POST's "Tech-Sherpas" will assist and manage the set up where required, at no additional cost.
In order to submit customer data from Patchworks to ZAP~POST, you need to ensure you have a campaign created and a design published. See our for a detailed walk through.
For this use case example, we'll be using a Klaviyo shape to find where our recipient data is coming from.
From the Patchworks home page, click on Process Flows
Click on Create New Flow
Name your flow, give it a description and select the Production Flow slider
Build your flow, selecting any connectors and relevant shapes
Once you've added the shape that data is being ingested from, you'll need to add a Map shape
You need to amend the Map shape settings to map the fields from one connector to another, in this instance, Klaviyo to ZAP~POST. Click on the Map shape settings icon
Select your Source Endpoint and your Target Endpoint
Click Generate Automatic Mapping, you can amend the mapping results or set them up manually
Click Save
Add a ZAP~POST Connector shape
When adding either a POST Submission or a POST Records shape, you'll notice 3 variables
Campaign ID - this is a required field and can be found in the ZAP~POST app. Sceduled Send Date ID - this is optional and can be left blank Only Valid Records - this is optional and defaults to true
For more information on these variables, see our
Once saved, you can initialise your flow
To confirm your submission, log into the ZAP~POST app
Click Processing in the top Nav
You should see your submission in the table
In order to ingest Profiles from your HubSpot List (Active or Static), you need to ensure you have a campaign created and a design published, see our for a detailed walk through.
From the Campaign Management screen, click the data upload option and then select New Data Connection
Select the HubSpot tile as your data connection
Using the table, find the List (Active or Static) you want to use and click the connect icon
Confirm your field mapping, on the left you'll see the ZAP~POST Campaign fields, using the drop down you can map them to your HubSpot Contact fields.
Once confirmed, you'll see a confirmation that the List has been connected.
This document is intended to serve as a guide for integrating Shopify into ZAP~POST
Summary functionality:
Collect recipient data from Shopify segments.
Set the frequency of data collection.
Map to ZAP~POST Campaign.
Map any custom fields you have set up in the ZAP~POST Campaign.
Shopify Contacts are updated to record recipients who have/have not received a ZAP.
Any returns (undeliverables) are updated on Shopify on a daily basis.
Integration to Shopify is directly available from your ZAP~POST account, once signed in.
When a campaign is created, connect Recipient data via “Data Sources” from within the app, you will be directed to the integration page where there are Shopify templates to choose from.
From within the app, connect to Shopify with your usual credentials and navigate to the Shopify Customer or Contact segments and connect to each of the ZAP~POST campaigns as required. You have tools to set the frequency of upload (we recommend once per day).
Set up is self-service whilst ZAP~POST’s “Tech-Sherpas” will assist and manage the set up where required, at no additional cost.
List (Static)
Static collections of contacts, usually created manually or through an import process
Used for sending one-time campaigns or emails to a specific group of contacts.
List (Active)
Dynamic groups of contacts that meet certain criteria, automatically updating as customer data changes
Used for targeted marketing campaigns based on behaviour, demographics, purchase history, etc.
Contacts
Detailed records of individual customers, including contact information, preferences, and behaviour history
Used for segmentation, personalisation, and targeted marketing campaigns.
Company
Detailed records of individual companies, including contacts and preferences
Used for segmentation, personalisation, and targeted marketing campaigns.
Campaign
A Campaign is made up of a name, fields, paper stock, content and submissions. It can be reused multiple times for multiple Direct Mail Sends
Used to create designs and associated records for physical mailing
Submission
A submission is a collection of records that is submitted against a campaign
The submission will contain data specific to the campaign and will be paired with a Scheduled Send.
Record
Contains the data for an individual customer the client is targeting for a campaign
Recipient data such as first name, last name and address details for an end user. Records can go through a Cleanse process
Data Connection
Shows when a list is connected to a campaign
This shows all campaigns that're connected to a list. Multiple lists can be connected to a campaign
Sync History
Logs when ZAP~POST has ingested data from HubSpot
Can be used to see when ZAP~POST ingests data from a list or segment as well how many profiles are received
PAF
As part of address processing, ZAP~POST takes the records you've submitted and uploads them to the Postcode Address File aka PAF
The UK Postcode Address File (PAF) is a database that contains all known 'delivery points' and postcodes in the United Kingdom. The 'delivery points' held on the PAF are routing instructions used by Royal Mail to sort and deliver mail quickly and accurately.
Cleanse
Deceased and gone away checks are included as part of ZAP~POST's data cleansing process.
These checks are performed against a list of 3rd party services/agencies such as The Bereavement Register and Mailing Preference Service


You have the ability to add custom fields to your ZAP~POST campaigns, these fields allow you to choose data specific for your campaigns and customer data to be displayed on your Direct Mail campaigns. For more help on setting up custom fields, see our detailed documentation.
To add custom fields to your Patchworks Integration:
In Patchworks, navigate to Connectors & Instances
Click settings
Select Endpoints (you'll want to edit the POST Submissions and POST Records endpoints)
Click on Schema and then Edit
Paste the below into the Schema
{
      "customerid": "Value",
      "email": "Value",
      "salutation": "Value",
      "firstname": "Value",
      "surname": "Value",
      "address1": "Value",
      "address2": "Value",
      "address3": "Value",
      "city": "Value",
      "postcode": "Value",
      "country": "Value",
      "currency": "Value",
      "language": "Value",
      "customdata:" {
        "customfield1": "Value"
      }
}
Change the customfield1 name to match the custom field label you created in the ZAP~POST app.
Click Save Schema then Save and go back
On your flow, you'll need to map which data should populate your new custom field
On your mapping step, click on the settings icon
Click Add Mapping Rule
For the left field, select the field where the data is coming from
For the right field, the Payload should be customdata.customfield1
Change the customfield1 name to match the custom field label you created in the ZAP~POST app, for example, customdata.dateofbirth
Click Accept then Save
You're all set!
This document is intended to serve as a guide for integrating Emarsys into ZAP~POST
Summary functionality:
Collect recipient data from Emarsys segments.
Set the frequency of data collection.
Map to ZAP~POST Campaign.
Map any custom fields you have set up in the ZAP~POST Campaign.
Emarsys Contacts are updated to record recipients who have/have not received a ZAP.
Any returns (undeliverables) are updated on Emarsys on a daily basis.
Integration to Emarsys is directly available from your ZAP~POST account, once signed in.
When a campaign is created, connect Recipient data via “Data Sources” from within the app, you will be directed to the integration page where there are Emarsys templates to choose from.
From within the app, connect to Emarsys with your usual credentials and navigate to the Emarsys Customer or Contact segments and connect to each of the ZAP~POST campaigns as required. You have tools to set the frequency of upload (we recommend once per day).
Set up is self-service whilst ZAP~POST’s “Tech-Sherpas” will assist and manage the set up where required, at no additional cost.
Tracking
The process of capturing customer actions and events, such as email opens, clicks and purchases
Implemented through Klaviyo’s Track API to log both built-in and custom events.
Metrics
Specific actions or events taken by customer that are tracked within Klaviyo, like "Placed Order"
Custom Metrics in Klaviyo: This feature enables the tracking and utilisation of custom metrics within Klaviyo by leveraging the Klaviyo Track API. Users can create specific events unique to their business, such as product reviews or other customer actions, which are not covered by Klaviyo's built-in metrics. These custom events can trigger automated workflows and personalised marketing campaigns within Klaviyo.
Profiles
Detailed records of individual customers, including contact information, preferences, and behaviour history
Used for segmentation, personalisation, and targeted marketing campaigns.
Lists
Static collections of profiles, usually created manually or through an import process
Used for sending one-time campaigns or emails to a specific group of contacts.
Segments
Dynamic groups of profiles that meet certain criteria, automatically updating as customer data changes
Used for targeted marketing campaigns based on behaviour, demographics, purchase history, etc.
Flows
Automated workflows that send messages or perform actions based on specific triggers, such as metrics.
Used to create multi-step, automated marketing campaigns like welcome series.
Campaigns
One-time email or SMS messages sent to a list or segment of contacts.
Used for promotions, newsletters, announcements, and other time-sensitive communications.
Campaign
A Campaign is made up of a name, fields, paper stock, content and submissions. It can be reused multiple times for multiple Direct Mail Sends
Used to create designs and associated records for physical mailing
Submission
A submission is a collection of records that is submitted against a campaign
The submission will contain data specific to the campaign and will be paired with a Scheduled Send.
Record
Contains the data for an individual customer the client is targeting for a campaign
Recipient data such as first name, last name and address details for an end user. Records can go through a Cleanse process
Data Connections
Shows when a list and/or segment are connected to a campaign
This shows all campaigns that're connected to either a list or a segment. Multiple lists and segments can be connected to a campaign
Sync History
Logs when ZAP~POST has ingested data from Klaviyo
Can be use to see when ZAP~POST ingests data from a list or segment as well how many profiles are received
PAF
As part of address processing, ZAP~POST takes the records you've submitted and uploads them to the Postcode Address File aka PAF
The UK Postcode Address File (PAF) is a database that contains all known 'delivery points' and postcodes in the United Kingdom. The 'delivery points' held on the PAF are routing instructions used by Royal Mail to sort and deliver mail quickly and accurately.
Cleanse
Deceased and gone away checks are included as part of ZAP~POST's data cleansing process.
These checks are performed against a list of 3rd party services/agencies such as The Bereavement Register and Mailing Preference Service


This document is intended to serve as a guide for integrating Klaviyo into ZAP~POST. Alternatively, watch the video on how to set up the Klaviyo x ZAP~POST integration
Summary functionality:
Collect recipient data from Klaviyo Lists and Segments.
Map to ZAP~POST Campaign.
Map any custom fields you have set up in the ZAP~POST Campaign.
Events are added to Klaviyo profiles.
Integration to Klaviyo is directly available from your ZAP~POST account, once signed in.
When a campaign is created, connect Recipient data via “Data Sources” from within the app, you will be directed to Klaviyo to authorise the integration.
Set up is self-service whilst ZAP~POST’s “Tech-Sherpas” will assist and manage the set up where required, at no additional cost. Alternatively, watch the video.

see the steps below, or watch the video
Log into the app at zappost.com
From the Dashboard click on the Integrations tile
Here you will see a tile to add Klaviyo
Click Connect. This will direct you to Klaviyo's permissions page, click Allow to give ZAP~POST access to the necessary information to integrate with Klaviyo.
You will be redirected back to ZAP~POST, and you will see your Klaviyo Site ID with a status of Connected
You are all set, your Klaviyo account is integrated with ZAP~POST. In order to ingest list and segment data see our Use case how-to guide
This document is intended to serve as a guide for integrating Dotdigital into ZAP~POST. Alternatively, watch the video on how to get up the Dotdigital x ZAP~POST integration.
Summary functionality:
Collect recipient data from Dotdigital Lists and Segments
Map them to a ZAP~POST Campaign
Map any custom fields you have set up in the ZAP~POST Campaign
Update Dotdigital contacts with updated addresses.
When a campaign is created, connect recipient data via 'Data Sources' from within the app.
Set up is self-service whilst ZAP~POST's "Tech Sherpas" will assist and manage the set up where required, at no additional cost.


This document is intended to serve as a guide for the integration of Iterable into ZAP~POST
Summary functionality:
Collect recipient data from Iterable segments.
Set the frequency of data collection.
Map to ZAP~POST Campaign.
Map any custom fields you have set up in the ZAP~POST Campaign.
Iterable Contacts are updated to record recipients who have/have not received a ZAP.
Any returns (undeliverables) are updated on Iterable on a daily basis.
Integration to Iterable is directly available from your ZAP~POST account, once signed in.
When a campaign is created, connect Recipient data via “Data Sources” from within the app, you will be directed to the integration page where there are Iterable templates to choose from.
From within the app, connect to Iterable with your usual credentials and navigate to the Iterable Customer or Contact segments and connect to each of the ZAP~POST campaigns as required. You have tools to set the frequency of upload (we recommend once per day).
Set up is self-service whilst ZAP~POST’s “Tech-Sherpas” will assist and manage the setup where required, at no additional cost.
Log in to Patchworks
From the home page, click on Marketplace
Search for ZAP~POST and click Install
Log into ZAP~POST at zappost.com
From the dashboard, click on settings
Select API consumers and Add New Consumer
Never share your API credentials with anyone you don't trust
In Patchworks, click on Process Flows then Connectors & Instances
Click Add new instance
Give your instance a name, we suggest something like 'ZAP~POST Production'
Click Next Step
Basic Authentication should already be selected, click Next Step
Here you need to enter your API Key and API Password from step 6
You're all set, your Patchwork and ZAP~POST accounts are integrated. To start ingesting customer data, see our Use case how-to guide


The Klaviyo settings page offers several important pieces of functionality which allow users to maintain their integration on a day to day basis.
In order to access the integration settings you can navigate to Integrations via the nav bar, then select the Klaviyo integration
From there you will see a list of the settings options available Integration Status: Shows the connection status of the Klaviyo account paired with ZAP~POST
Data Connections: Allows users to manage the campaign data connection, pairing lists & segment profiles with ZAP Sends.
Sync History: This will show details of any data ingestion events that have occurred as part of the integration
Settings: Change the sync frequency and address correction options
Logs: View API logs from Klaviyo and ZAP~POST for troubleshooting and data auditing purposes.
The integration status will detail how many Klaviyo accounts that are paired with your ZAP~POST account, showing the connection status and allowing users to disconnect the Klaviyo instance. Disconnecting this integration will also remove any data connections you currently have setup for the integration.
This page shows your Zap campaigns that have data connections and offers several key pieces of information and functionality when it comes to the Klaviyo integration. It will show which Klaviyo segments or lists are currently configured with your ZAP Campaigns showing key information such as: Connected Data, Connect Name, Connection Type, Last Submission Date and status. All dates are displayed in UTC (Coordinated Universal Time).
The sync connections button allows users to bypass the scheduled ingestion and manually trigger an immediate ingestion event. This will cause the connection to compile any contained profiles into a ZAP Submission using the campaigns published artwork which will be processed and mailed.
If a user needs to pause a connection for any reason, they can use the pause button which will stop the ingest of any new records until the connection is un-paused.
If for any reason you should need to change the data mapping on your connection, this can be done via the mapping button on the table. This will open the mapping UI and allow any values to be set as needed.
This will remove the data connection, unpairing the list or segment from the ZAP Campaign.
Sync history will show the details of any historic data ingestion events from Klaviyo detailing the following: Campaign name, segment or list name, segment or list type, ingestion date, profile count, submission link (When applicable) and a slide out containing further information (Sync Id, Submission Id, Sync, Number of Successfully-Imported Profiles, Number of Failed Profiles, Sync Errors).
When enabled, we will automatically update any of your connected Klaviyo profiles’ address data when we find a problem with the address as part of our PAF and Cleanse processes.
Users can alter the frequency within which we poll Klaviyo. This can range from once an hour to once a day.
In this section users can view the technical logs for the integration. This information is critical for troubleshooting and data auditing information.
Users can view the following information: Data of API request, API Verb, URL, Response Status Code as well as the request and response header and body information.


Whenever ZAP~POST receives a submission and the Bloomreach integration is enabled, then it will try to create the relevant events on your Bloomreach profiles. In order to do this, the data submitted to ZAP~POST must contain an identifier which can be used to track down your Bloomreach profiles.
Once these events are being populated on your customers you can configure your own scenarios to handle situations such as malformed delivered addresses or QR code scans.

This document is intended to serve as a guide for integrating Bloomreach Engagement (Exponea) into ZAP~POST.
Bloomreach Engagement can integrate with ZAP~POST in two ways. Pushing Recipient Data from Bloomreach to ZAP~POST Bloomreach scenarios can be used to push recipient data from Bloomreach to ZAP~POST in order to create mailings. This is explained here Getting ZAP~POST Event Data back into Bloomreach Whenever a key event occurs in ZAP~POST such as a mailing being Sent or a QR Code being scanned an event can be created on your Bloomreach Customer profiles. This is explained here
In order to configure the Bloomreach integration, you will need to have prepared the following information: 1. Project Token
API Base URL
API Key ID
API Secret
IMPORTANT NOTE: The API credentials must also have permissions to create New Events.
If you're unsure how to get these, please follow this guide: First go to settings and select Project Settings on .
Select Access Management > API
Select the option to add a new API Key and give it a name
Once you're happy click create. Your API Keys will be created and the Secret will be shown. Be sure to keep a copy of your API Key ID and the API Secret. The final step for the API Keys is to ensure they have the necessary permissions to Set new events.
As well as these two values, you'll also need the Project ID and the Base URL also available on screen.
Once you have all 4 values, you're ready to set up the integration in the ZAP POST App
Log into the app at
From the Dashboard click on the Integrations tile
Here you will see a tile to add Bloomreach
Once selected you'll have the option to configure the connection. This will require you to input some credentials from the Bloomreach application that you prepared earlier. Each value should match the label in the Bloomreach API access settings.
Once you click connect the credentials will be tested and the connection will be confirmed. If at any point you wish to disconnect the integration, you can use the disconnect button to do so.


In order to submit customer data from Force24 to ZAPPOST, you need to ensure you have a campaign created and a design published. See our ZAP~POST User Guide for a detailed walk through.
Log in to Force24
From the home page, click on Marketplace
Select Alerts and Messages
Click ZAP~POST
Select the same paperstock as the campaign you've created on ZAP~POST
Give your integration a name. Suggest: 'ZAP~POST'
You'll now need to create an API consumer within your ZAP~POST account
Log into ZAP~POST at zappost.com
From the dashboard, click on settings
Select API consumers and Add New Consumer
Never share your API credentials with anyone you don't trust
In Force24, add your API Key and API Password
The environment should default as Production
Click Next
Select the Marketing List that you would like to send Direct Mail (Zaps) to
Select the campaign you've created in ZAP~POST
Click create
You're all set. Contacts in the marketing list will flow into your ZAP~POST campaign each day, and will be sent on the next available sending date.
You only need one ZAP~POST integration, to connect multiple marketing lists to multiple campaigns.


Set up the Integration in the ZAP~POST app
See the steps below, or watch the video
Log into Dotdigital
Once logged in head to Settings and Access
Once in Access click on API Users
Click Add New API User
The email address will be automatically populated, add a description, something like 'ZAPPOST Integration'
Add a password and click Save
Once an API user has been created, log into ZAP~POST
From the dashboard click on the integrations tile
Here you will see a tile to add Dotdigital
Add the API username and password that was created in Dotdigital
Click Connect
If the correct credentials have been provided, you see a confirmation
You are all set! Your Dotdigital account is integrated with ZAP~POST. In order to ingest List and Segment data see our Use case how-to guide


This document is intended to serve as a guide for integrating Ometria into ZAP~POST
Summary functionality:
Collect recipient data from Ometria segments.
Set the frequency of data collection.
Map to ZAP~POST Campaign.
Map any custom fields you have set up in the ZAP~POST Campaign.
Ometria Contacts are updated to record recipients who have/have not received a ZAP.
Any returns (undeliverables) are updated on Ometria on a daily basis.
Integration to Ometria is directly available from your ZAP~POST account, once signed in.
When a campaign is created, connect Recipient data via “Data Sources” from within the app, you will be directed to the integration page where there are Ometria templates to choose from.
From within the app, connect to Ometria with your usual credentials and navigate to the Ometria Customer or Contact segments and connect to each of the ZAP~POST campaigns as required. You have tools to set the frequency of upload (we recommend once per day).
Set up is self-service whilst ZAP~POST’s “Tech-Sherpas” will assist and manage the set up where required, at no additional cost.
The HubSpot settings page offers several important pieces of functionality which allow users to maintain their integration on a day to day basis.
In order to access the integration settings you can navigate to Integrations via the nav bar, then select the HubSpot integration
From there you will see a list of the settings options available
Integration Status: Shows the connection status of the HubSpot account paired with ZAP~POST
Data Connections: Allows users to manage the campaign data connection, pairing lists with ZAP Sends.
Sync History: This will show details of any data ingestion events that have occurred as part of the integration
Settings: Change the sync frequency and address correction options
Logs: View API logs from HubSpot and ZAP~POST for troubleshooting and data auditing purposes.
The integration status will detail how many HubSpot accounts that are paired with your ZAP~POST account, showing the connection status and allowing users to disconnect the HubSpot instance. Disconnecting this integration will also remove any data connections you currently have setup for the integration.
This page shows your Zap campaigns that have data connections and offers several key pieces of information and functionality when it comes to the HubSpot integration. It will show which HubSpot segments or lists are currently configured with your ZAP Campaigns showing key information such as: Connected Data, Connect Name, Connection Type, Last Submission Date and status. All dates are displayed in UTC (Coordinated Universal Time).
The sync connections button allows users to bypass the scheduled ingestion and manually trigger an immediate ingestion event. This will cause the connection to compile any contained profiles into a ZAP Submission using the campaigns published artwork which will be processed and mailed.
If a user needs to pause a connection for any reason, they can use the pause button which will stop the ingest of any new records until the connection is un-paused.
If for any reason you should need to change the data mapping on your connection, this can be done via the mapping button on the table. This will open the mapping UI and allow any values to be set as needed.
This will remove the data connection, unpairing the list or segment from the ZAP Campaign.
Sync history will show the details of any historic data ingestion events from HubSpot detailing the following: Campaign name, segment or list name, segment or list type, ingestion date, profile count, submission link (When applicable) and a slide out containing further information (Sync Id, Submission Id, Sync, Number of Successfully-Imported Profiles, Number of Failed Profiles, Sync Errors).
HubSpot profile address data correction
When enabled, we will automatically update any of your connected HubSpot profiles’ address data when we find a problem with the address as part of our PAF and Cleanse processes.
Users can alter the frequency within which we poll HubSpot. This can range from once an hour to once a day.
In this section users can view the technical logs for the integration. This information is critical for troubleshooting and data auditing information.
Users can view the following information: Data of API request, API Verb, URL, Response Status Code as well as the request and response header and body information.


In order to ingest Profiles from your Klaviyo List or Segment, you need to ensure you have a campaign created and a design published, see our ZAP~POST User Guide for a detailed walk through.
From the Campaign Management screen, click the data upload option and then select New Data Connection
Select the Klaviyo tile as your data connection
Using the table, find the List or Segment you want to use and click the connect icon
Confirm your field mapping, on the left you'll see the ZAP~POST Campaign fields, using the drop down you can map them to your Klaviyo Profile fields.
Once confirmed, you'll see a confirmation that the List or Segment has been connected.
After ZAP~POST has cleansed your data and posted your Zaps, we'll automatically update your Klaviyo profiles with an updated address, if you don't want this this happen you can turn it off in Settings.


When Klaviyo profiles are processed through ZAP~POST, they are updated with events to keep you informed of any changes. Events are created automatically and require no additional set up. For detailed information on any of the above fields, see our User Guide and API Documentation.
Event Name: ZAP~POST Submission Created

ScheduledSendId: The unique identifier for the ZAP~POST Scheduled Send
SubmissionId: The unique identifier given to a batch of records submitted to ZAP~POST
ScheduledSendDateUTC: The date for the scheduled send e.g. 01/01/2025
CampaignName: The name of the campaign that record was submitted against
CampaignId: The unique identifier for the ZAP~POST campaignEvent Name: ZAP~POST Address Updated
ScheduledSendId: The unique identifier for the ZAP~POST Scheduled Send
SubmissionId: The unique identifier given to a batch of records submitted to ZAP~POST
ScheduledSendDateUTC: The date for the scheduled send e.g. 01/01/2025
CampaignName: The name of the campaign that record was submitted against
CampaignId: The unique identifier for the ZAP~POST campaign
OriginalAddress: The original address details received from Klaviyo
UpdatedAddress: The updated address received due postage address checksEvent Name: ZAP~POST Direct Mail Rejected
ScheduledSendId: The unique identifier for the ZAP~POST Scheduled Send
SubmissionId: The unique identifier given to a batch of records submitted to ZAP~POST
ScheduledSendDateUTC: The date for the scheduled send e.g. 01/01/2025
CampaignName: The name of the campaign that record was submitted against
CampaignId: The unique identifier for the ZAP~POST campaign
RejectedDate(UTC): The date the record was rejectedEvent Name: ZAP~POST Direct Mail Sent
ScheduledSendId: The unique identifier for the ZAP~POST Scheduled Send
SubmissionId: The unique identifier given to a batch of records submitted to ZAP~POST
ScheduledSendDateUTC: The date for the scheduled send e.g. 01/01/2025
CampaignName: The name of the campaign that record was submitted against
CampaignId: The unique identifier for the ZAP~POST campaignEvent Name: ZAP~POST QR Code Scan
ScheduledSendId: The unique identifier for the ZAP~POST Scheduled Send
SubmissionId: The unique identifier given to a batch of records submitted to ZAP~POST
ScheduledSendDateUTC: The date for the scheduled send e.g. 01/01/2025
CampaignName: The name of the campaign that record was submitted against
CampaignId: The unique identifier for the ZAP~POST campaign
ScanDate(UTC): The date the QR code was scanned
ScanTime(UTC): The time the QR code was scanned
DestinationURL: The URL the recipient was directed toEvent Name: ZAP~POST Direct Mail Returned
ScheduledSendId: The unique identifier for the ZAP~POST Scheduled Send
SubmissionId: The unique identifier given to a batch of records submitted to ZAP~POST
ScheduledSendDateUTC: The date for the scheduled send e.g. 01/01/2025
CampaignName: The name of the campaign that record was submitted against
CampaignId: The unique identifier for the ZAP~POST campaign
ReturnedDate(UTC): The date the returned Zap was received to sender This document is intended to serve as a guide for integration Braze into ZAP~POST
Summary functionality:
Collect recipient data from Braze segments.
Set the frequency of data collection.
Map to ZAP~POST Campaign.
Map any custom fields you have set up in the ZAP~POST Campaign.
Braze Contacts are updated to record recipients who have/have not received a ZAP.
Any returns (undeliverables) are updated on Braze on a daily basis.
Integration to Braze is directly available from your ZAP~POST account, once signed in.
When a campaign is created, connect Recipient data via “Data Sources” from within the app, you will be directed to the integration page where there are Braze templates to choose from.
From within the app, connect to Braze with your usual credentials and navigate to the Braze Customer or Contact segments and connect to each of the ZAP~POST campaigns as required. You have tools to set the frequency of upload (we recommend once per day).
Set up is self-service whilst ZAP~POST’s “Tech-Sherpas” will assist and manage the setup where required, at no additional cost.
ZAP~POST automatically updates your Hubspot profiles with key direct mail events.
When mail is processed through ZAP~POST, your HubSpot contacts will be updated with timeline events to keep you informed of any progress. Below is a list of a key events and the data you can expect to see in HubSpot when these events occur. Events are created automatically and require no additional set up. For detailed information on any of the above fields, see our User Guide and API Documentation.
In order to see your ZAP~POST events in the HubSpot UI you will need to enable them in your activity filters. This can be done on the Contact or Company activity tab.
Event Name: ZAP~POST Submission Created

ScheduledSendId: The unique identifier for the ZAP~POST Scheduled Send
SubmissionId: The unique identifier given to a batch of records submitted to ZAP~POST
ScheduledSendDateUTC: The date for the scheduled send e.g. Jul 28, 2025
CampaignName: The name of the campaign that record was submitted against
CampaignId: The unique identifier for the ZAP~POST campaignEvent Name: ZAP~POST Address Updated
ScheduledSendId: The unique identifier for the ZAP~POST Scheduled Send
SubmissionId: The unique identifier given to a batch of records submitted to ZAP~POST
ScheduledSendDateUTC: The date for the scheduled send e.g. Jul 28, 2025
CampaignName: The name of the campaign that record was submitted against
CampaignId: The unique identifier for the ZAP~POST campaign
OriginalAddress: The original address details received from Klaviyo
UpdatedAddress: The updated address received due postage address checksEvent Name: ZAP~POST Direct Mail Rejected
ScheduledSendId: The unique identifier for the ZAP~POST Scheduled Send
SubmissionId: The unique identifier given to a batch of records submitted to ZAP~POST
ScheduledSendDateUTC: The date for the scheduled send e.g. Jul 28, 2025
CampaignName: The name of the campaign that record was submitted against
CampaignId: The unique identifier for the ZAP~POST campaign
RejectedDate(UTC): The date the record was rejectedEvent Name: ZAP~POST Direct Mail Sent
ScheduledSendId: The unique identifier for the ZAP~POST Scheduled Send
SubmissionId: The unique identifier given to a batch of records submitted to ZAP~POST
ScheduledSendDateUTC: The date for the scheduled send e.g. Jul 28, 2025
CampaignName: The name of the campaign that record was submitted against
CampaignId: The unique identifier for the ZAP~POST campaignEvent Name: ZAP~POST QR Code Scan
ScheduledSendId: The unique identifier for the ZAP~POST Scheduled Send
SubmissionId: The unique identifier given to a batch of records submitted to ZAP~POST
ScheduledSendDateUTC: The date for the scheduled send e.g. Jul 28, 2025
CampaignName: The name of the campaign that record was submitted against
CampaignId: The unique identifier for the ZAP~POST campaign
ScanDate(UTC): The date the QR code was scanned
ScanTime(UTC): The time the QR code was scanned
DestinationURL: The URL the recipient was directed toEvent Name: ZAP~POST Direct Mail Returned
ScheduledSendId: The unique identifier for the ZAP~POST Scheduled Send
SubmissionId: The unique identifier given to a batch of records submitted to ZAP~POST
ScheduledSendDateUTC: The date for the scheduled send e.g. Jul 28, 2025
CampaignName: The name of the campaign that record was submitted against
CampaignId: The unique identifier for the ZAP~POST campaign
ReturnedDate(UTC): The date the returned Zap was received to sender 
In order to update a profile in Bloomeach with events, ZAP~POST must be able to find the user profile. In order to achieve this we will pair up any CustomerIDs provided to ZAP~POST with the Registered ID in ZAP~POST. If these two values DO NOT MATCH, then the profile will not be updated.
